A New Era in Coding: Exploring Bolt.new, the AI-Powered Development Assistant

A New Era in Coding: Exploring Bolt.new, the AI-Powered Development Assistant
In the ever-evolving tech landscape, artificial intelligence (AI) continues to reshape industries. One of the latest breakthroughs in the realm of software development is Bolt.new, a cutting-edge AI tool designed to revolutionize how developers create websites and applications. Bolt.new isn’t just another coding assistant—it’s a full-stack development companion that can generate frontend and backend code while seamlessly integrating with tools like Supabase.
In this blog, we’ll dive into what Bolt.new is, its standout features, and how it’s redefining the coding experience for developers of all skill levels.
What is Bolt.new
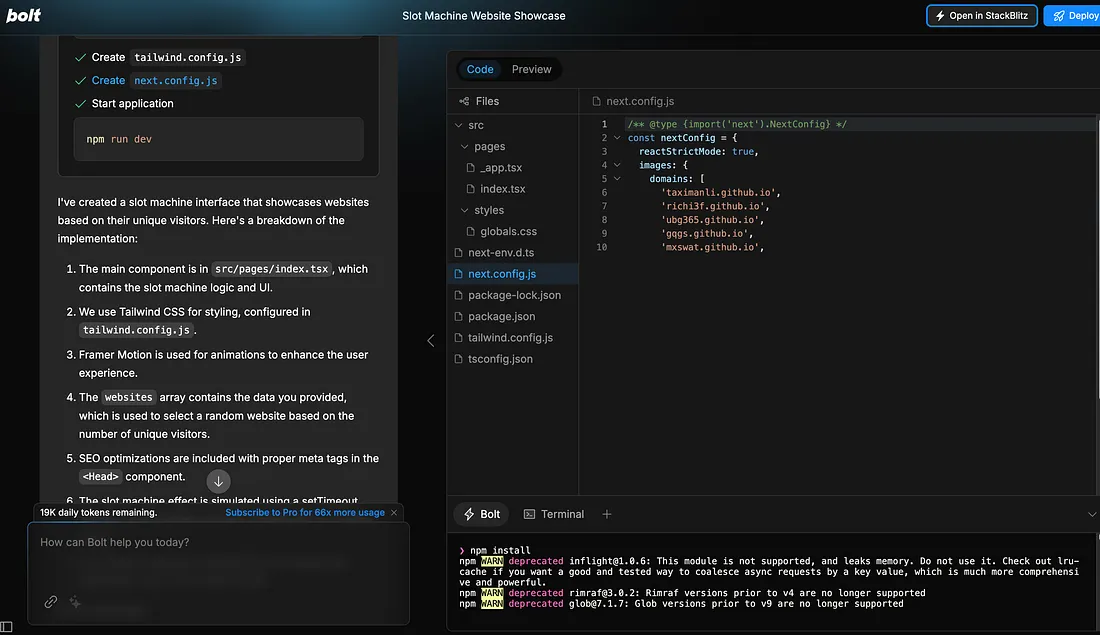
Bolt.new is an innovative platform that combines AI technology with a powerful in-browser development environment. Launched in 2023, it aims to simplify coding by enabling developers to build, edit, and deploy web applications directly from their browsers. This tool bridges the gap between traditional development environments and AI-powered coding assistants, providing a smoother, more intuitive user experience.
This tool supports popular frameworks like React, Vite, and Next.js, making it versatile for creating modern, dynamic websites and applications. With Bolt.new, coding becomes faster, more efficient, and accessible to everyone—from beginners to seasoned professionals. Whether you’re developing a simple portfolio website or a complex SaaS application, Bolt.new adapts to your needs and automates the tedious aspects of development.
The idea behind Bolt.new is to eliminate the setup process typically required for backend services and frameworks, so developers can spend more time coding and less time configuring tools.
Top Features of Bolt.new
AI-Powered Code Generation
With Bolt.new, you can write simple text prompts, and the AI generates high-quality code for your application. Whether it’s a complex frontend interface or backend logic, Bolt.new has you covered. This intelligent code generation can save you hours, allowing you to focus on refining your application.Example Prompt: "Generate a login form with email and password validation in React."
No Local Setup Required
Forget about installing software or setting up your development environment. Bolt.new runs entirely in your browser, offering a hassle-free experience. Developers can focus on building their projects instead of configuring local environments, making it ideal for fast prototyping or personal projects.This eliminates the need for local IDEs or dependency management tools, providing an intuitive environment where coding is as simple as clicking a button.
Integration with Supabase
Bolt.new integrates seamlessly with Supabase, an open-source backend platform. This allows you to set up a fully functional database, manage APIs, and incorporate real-time features effortlessly. Supabase takes the complexity out of backend services by offering an easy-to-use interface for database management, authentication, and real-time subscriptions, which can be integrated into your application with minimal setup.Framework Flexibility
Developers can use popular frameworks like React, Vite, and Next.js, ensuring they work with tools they’re familiar with while exploring new possibilities with AI assistance. You can switch between frameworks seamlessly, making it easy to experiment with different setups without worrying about compatibility issues. For instance, you could build the front-end in React and the backend with Supabase, leveraging the full power of both platforms.One-Click Deployment
Once your application is ready, deploy it instantly with just a few clicks. Bolt.new streamlines the deployment process, eliminating traditional bottlenecks. In a matter of seconds, your app will be up and running on the web, saving you from dealing with deployment configuration or cloud service providers.
How Bolt.new Simplifies Development
1. Beginner-Friendly
If you’re new to coding, Bolt.new can serve as a virtual mentor. Simply describe what you want to build, and the AI takes care of the heavy lifting. For example, if you're unsure how to start a project or structure your code, Bolt.new can give you a solid starting point with optimized code suggestions. This reduces the learning curve and makes web development more approachable for beginners.
2. Saves Time for Professionals
Experienced developers can use Bolt.new to automate repetitive tasks, freeing up time for more complex challenges. By automating the creation of boilerplate code or standard components, developers can focus on building innovative features rather than duplicating effort. For example, setting up user authentication, input forms, and even UI components becomes a breeze with AI assistance.
3. Collaboration Made Easy
Because Bolt.new is browser-based, sharing projects with team members is seamless. Collaborate in real-time without worrying about compatibility issues. Since everything is stored in the cloud, team members can easily join the project, make edits, and contribute to the codebase without needing to synchronize their local development environments.
Getting Started with Bolt.new
Visit the Platform: Head over to Bolt.new to access the tool.
Sign Up: Create an account to unlock all features. Signing up is quick, and you can start building your first project immediately.
Start Coding: Use prompts to generate code and customize it as needed. Whether you’re building a static website or a dynamic web app, Bolt.new’s AI capabilities will assist you every step of the way.
Deploy: Once satisfied with your project, you can deploy it to the web with a single click. The deployment process is simple, intuitive, and ready to handle real-world applications.
Why Bolt.new is a Game-Changer
The integration of AI into coding tools is transforming the way we approach software development. Bolt.new is a prime example of how AI can simplify and accelerate coding tasks, making development more accessible and efficient. Its ability to handle both frontend and backend tasks—while integrating with platforms like Supabase—makes it an invaluable asset for modern developers.
This powerful combination of AI and cloud-based tools significantly reduces the barriers to entry for those new to web development while simultaneously boosting the productivity of experienced professionals.
Whether you’re building your first website or scaling a production-ready app, Bolt.new equips you with the tools to succeed in today’s fast-paced digital world. With its powerful AI features, ease of use, and full-stack capabilities, you can focus on what matters most—creating amazing web experiences.
Conclusion
Bolt.new is more than just a tool—it’s a glimpse into the future of coding. By combining the power of AI with an intuitive, browser-based interface, Bolt.new empowers developers to turn ideas into reality faster than ever before. Whether you're a beginner just starting to learn coding or an experienced developer looking to accelerate your workflow, Bolt.new offers the perfect blend of simplicity and power.
Ready to experience the future of development? Explore Bolt.new today and join the revolution in AI-assisted coding.